Accuracy, precision, error, significant and non-significant figures
Questions:1. Since Chemistry is a Science of measurement, we talk of accurate and precise measurement. Explain those concepts, showing the difference. 2. Give a scientific explanation of error in a measurement. 3. In measurement and related calculations, we talk about significant figures and non-significant figures. Explain the meaning of those terms, showing the difference.
Answers
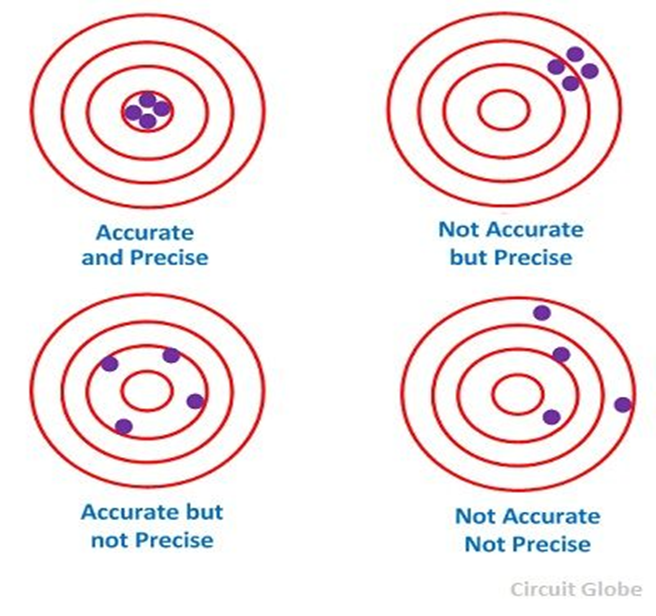
- Accuracy refers to how close a measurement is to the true or accepted value.
Precision refers to how close measurements of the same item by the same measurement instrument are to each other. Precision indicates the repetitiveness of the measurement by the same instrument.
Precision is independent of accuracy, i.e. it is possible to be very precise without being accurate, and it is very possible to be accurate without being precise; figures below show all kind of situations you can have in measurement:

(circuitglobeglobe.com)
The best scientific measurement must be both accurate and precise.
2. Scientific error and Reporting of measurement: for many and different reasons, any scientific measurement bears an error and this is scientifically accepted. The sources of error are many, from the person who is measuring (bad vision, wrong handling of the equipment, etc...) to the measuring instrument itself (non-standardized or calibrated, etc..).
Errors can be classified into two categories: systematic errors and random errors.
Systematic error: measurements of the same thing with the same instrument will vary in predictable ways; every measurement will differ from the true measurement in the same direction, and even by the same amount. For example, your weight is 60 Kg, but a given balance, every time you use it, shows you that your weight is 58 Kg, less than 2 Kg to the expected weight.
Generally a systematic error is due to a faulty measuring instrument or wrong manipulation of the instrument; this is corrected and eliminated by the calibration of the instrument and being careful when using the instrument. The calibration of a measuring instrument is the procedure for determining the correct values of measured quantity, using that instrument, by comparison with standard ones.
The systematic error can also be eliminate bringing the measuring instrument to a Metrology Service/Bureau of Standards where the default can be corrected.
Random error/Uncertainty: this is a chance or unpredictable difference between the observed and true values of something (e.g. a researcher misreading a weighing scale records an incorrect measurement). Random error/Uncertainty is in both direction, i .e + and – (±x), it can be minimized but not completely eliminated. Since random error is unpredictable, that is why it is recommended to carry out the same measurement at least 3 times and take the average.
Some measuring instruments may indicate the uncertainty associated to their measurement, others not. In the latter case, the following rules are often used:
(1) Uncertainty in a Scale Measuring Device = the smallest increment of the scale divided by 2.
(2) Uncertainty in a Digital Measuring Device = the smallest increment.
(3) Relative Uncertainty or relative error = Uncertainty/Measured quantity,
% Relative Uncertainty or relative error = [Uncertainty/Measured quantity] x 100
Carrying out, and Reporting of measurements: when carrying out and reporting a measurement, you write all readings indicated on the scale of the instrument, plus one value that you estimate between two divisions on the instrument, followed by ± uncertainty. When reporting or reading a scientific measurement correctly written, you understand that the accepted scientific error is in the last digit of the measurement.
Examples:
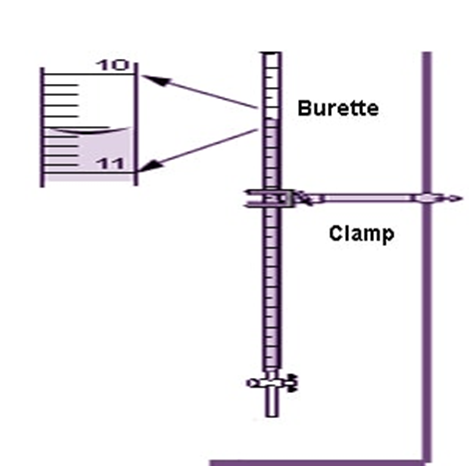
Using a burette: the measurement on the burette below is, (according to me): 10.59 mL; the digits 10.5 are directly read on the divisions of the burette, whereas the last digit 9 (0.09) is my estimation, and this is the only extent of estimation I am allowed to make with this instrument. Another person may read, 10.60 mL, another, 10.58 mL and those three measurements are scientifically correct. The scientific error must be in the last digit of the measurement, since the other digits are read on the divisions of the measuring instrument. I report my measurement as: 10.59 ±0.01 mL. This indicates that the true value is between 10.58 and 10.60 mL. This also indicates that the burette has a precision of 1/100mL
The relative error is: 0.01/10.59 and the percentage relative error = (0.01/10.59) x 100 = 0.09%
With this instrument, if I report the measurement as: 10.5 mL or 10.590 mL, it will be a wrong reporting; the first underestimates the precision of the instrument, because it puts it at 1/10 mL, the second overestimates the precision of the instrument, because it puts it at 1/1000 mL.

(qsstudy.com)
Using an electronic balance: m= 5.7513 kg; reporting m = 5.7513 ±0.0001 kg
3. Significant and non-significant figures
Significant figures, simply put, are figures that have a scientific meaning or significance, i.e. that are accepted in a correct scientific measurement. In the examples above, 10.59 mL, 10.60 mL and 10.58 mL are scientifically accepted measurements on that measuring instrument, and they have 4 significant figures.
Non-significant figures are figures that have no scientific meaning or significance in a measurement; for instance if I report the measurement as 10.591 mL, the last digit 1(0.001) is non-significant because the burette used for that measurement has a precision of only 1/100 ml not 1/1000 ml.
How to determine the number of significant figures?
There are rules helping to calculate the number of significant figures in a scientific measurement:
1- Non-zero digit are always significant
2- Zeros in between non-zero digits are always significant
3- Leading zeros are never significant; ex: 0.05 mL (one significant figure).
4- Trailing zeros are only significant if the number contains a decimal point; ex: 100.00 mL (5 significant figures); but 100 mL (one significant figure); for 100 mL, it is better seen when it is written in scientific notation: 1 x 10² mL (one significant figure).
5- Constants (physical constants, multiplication factors) have infinite significant figures.
How to determine significant figures in mathematical operations, addition/subtraction and multiplication/division, involving measurements.
Addition and subtraction: when adding or subtracting measurements, the result/answer must have the same number of figures after the decimal point as the least precise measurement:
Example: 358. 50 mL + 10.8 mL = 369.30 mL = 369.3 mL
The explanation is: since there is already an error in the 1st digit after the decimal in 10.8 mL, it would be meaningless to write the answer with 2 digits after the decimal point.
Multiplication and division: in these mathematical operations, the result/answer must have the same significant figures as the term that has the lowest significant figures.
Examples: - Surface of a rectangle: 23.34 m x 10.1 m = 235.734 m2 = 236 or 23.6 x 101 m2: 3 significant figures (as in 10.1 m that has the smallest number of significant figures)
- Perimeter of a Circle: C= 2πr = 2 x 3.14159 x 23.34 m =146.6494212 m = 146.6m, 4 significant figures (as in 23.34 m, because the other terms are constants and have infinite number of significant figures).
- Given a rectangular surface with of 50. 25 m2, and the length of 10.5 m, the width is: w = 50.25 m2/10.5 m = 4.78571429 m = 4.79 m, 3 significant figures (as in 10.5m with the smallest number of significant figures).